How to Build a Signage with WordPress and RasberryPi

I needed a simple, easy-to-use signage for a higher education institute. Existing signage software (open source or else) and online services I came across were all either pretty complicated to use or non-free.

I figured I could build one myself using WordPress and a few free plugins and running this on a Raspberry Pi-3 Model B+. Since RPi has an HDMI output, any TV would be suitable as the signage display. This way, the people who are supposed to maintain the signage will no longer need to be experienced IT people. A little WordPress knowledge will be sufficient.

What it looks like?

Parts List

      • A Rasberry Pi 3 Model B+ (“Rpi” in short) + a good power adapter.
      • A 32GB SD card ( RPi  will use this as the hard disk)
      • A Raspbian Desktop Linux image
      • HDMI cable
      • An LCD TV set to hang on the wall
      • A running WordPress installation  (on the RPi)

Preliminaries

I started by installing Raspbian (a special Debian flavor, tailored for RPi). I downloaded the desktop image from the Raspbian site and burned onto a SD using the dd command on my desktop Linux machine:

dd if=desktop.raspbian.img of=/dev/sdk bs=10000000

Then I installed a few Linux packages that I like and will use to run the RPi as a signage:

ntp: network time protocol
fail2ban: security related
apache2: web server
php, libapache2-mod-php, mysql-server, php-mysql, php-gd, php-xml

Just like all contemporary Debians, Raspbian comes with mariadb as a replacement of mysql database software. All mysql commands work just the same, though…

Then I installed WordPress on the RPi just like the way I would on any Linux distro. You might want to use your favorite search engine for help/tutorials on how to install WP on Debian Linux.

The Plugins I Used

Redirect URL to Post: This plugin by Chatty Mango is the backbone of my signage WP. This plugin can redirect to a randomly selected post when the URL contains the parameter “?redirect_to=random”. The plugin is capable of doing a lot more, but this is the function that was useful for me.

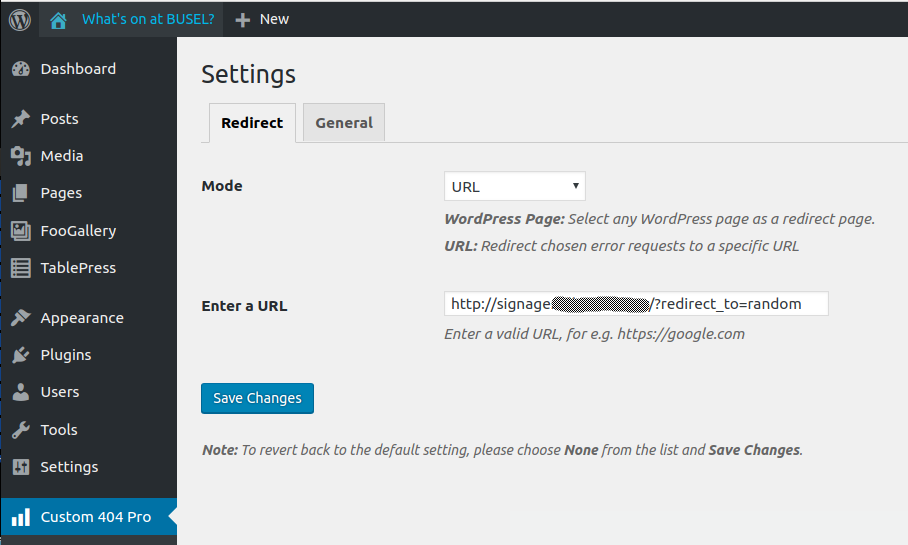
Custom 404 Pro: To avoid any missing post/page messages… If a post is accidentally lost or becomes inaccessible, the signage will be redirected to the main (first) page of the signage

i.e. (http:///signage.yourdomain.com?redirect_to=random).

Disable All WordPress Updates: Auto updates could be a nuisance when notices pop every now and then.

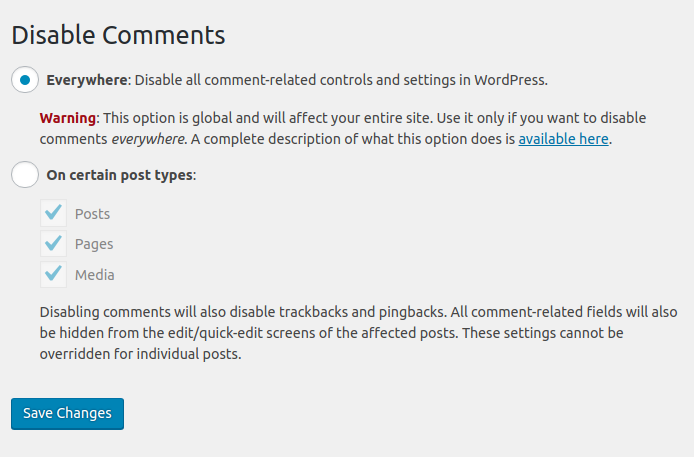
Disable Comments: Stop worrying about spam comments.

Disable Gutenberg: I didn’t like working with the Gutenberg page composer therefore I prefer to disable it. You might want to keep it, though,

Disable XML-RPC: Never used XML-RPC. Causes too many errors when robots try break your site. Disabling XML-RPC enhances security.

Easy Image Collage: Nice plugin to build masonry of pictures.

FooBox Image Lightbox and FooGallery: Very popular gallery management tools.

Head Meta Data: Another pillar plugin for the signage. This plugin injects meta tagged HTML code into every post/page, which redirects the page to another URL, after a certain amount of  seconds; namely to

http://signage.yourdomain.com?reditect_to=random

Post Expirator:  Using this plugin, one can remove posts from the signage cycle/pool automatically when the post becomes obsolete. For example, a signage post announcing a concert event, can automatically hide itself 15 minutes before the concert.

Post/Page specific custom CSS: This plugin is used to set CSS on a per-post basis. Useful when you want to use a different color or image for background of a certain post.

Spacer: A very useful short code to adjust vertical spacing of page components in pixels. A must have plugin for signages.

SVG Support: Vector images look much better when you scale them up or down in size. WordPress does not support the SVG image format by default. People say SVG format has security issues but I like this plugin anyway.

TablePress and TinyMCE Advanced: These are trivially handy tools for any WP site.

Some Important Plugin Settings

Custom 404 Pro

Disable Comments

Head Meta Data – Plugin Settings

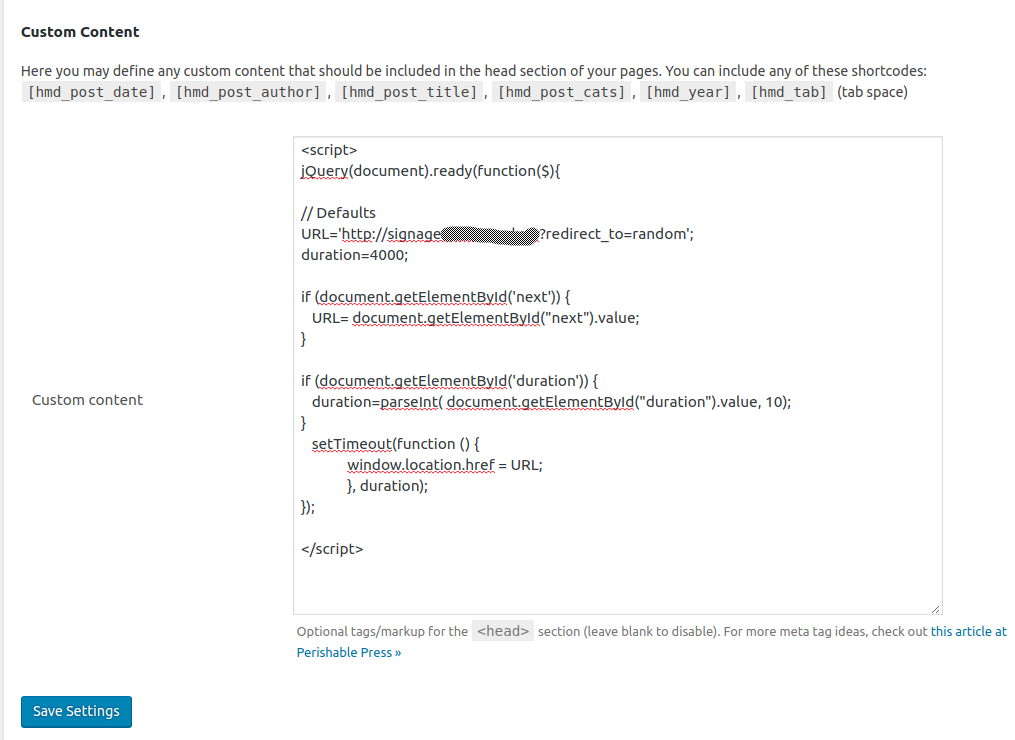
Here is the copy-pastable script:

<script>
jQuery(document).ready(function($){
URL='http://signage.yourdomain.com?redirect_to=random';
duration=400000;

if (document.getElementById('next')) {
URL=document.getElementById('next').value;
}

if (document.getElementById('duration')) {
duration=parseInt( document.getElementById("duration").value, 10);
} 
setTimeout(function () {
window.location.href = URL; 
}, duration); 
});

</script>

With the above custom content, the plugin will insert the given Javascript code into every post/page. The Javascript code has two important variables; the default duration for which a post will be displayed; namely the “duration” variable; and the default redirection URL.

<input type=hidden name=duration id=duration value=20000>

and/or

<input type=hidden name=next id=next value=”URL_of_the_next_slide”>

In order to add these hidden fields to the post, switch to “Text” mode in the post editor and type anywhere in the text the HTML code for the hidden field.

Sometimes you might have a video playing in a post; or a post with long text which might need longer than 4-10 seconds for the audience to read. In such cases, you would want to extend the time a post stays on the screen; such as the length of the video. You can set the time a post stays on the screen using the “duration” hidden field within that post. For example, if your video is 60 seconds long, you can place a hidden “duration” input field with a value of 60000.

Please note that the duration is in milliseconds. If such a field exists, the script will wait “duration” milliseconds and then refresh the page, redirecting it to “http://signage.yourdomain.com?redirect_to=random”. If there is no “duration” field within the page, the script will wait the default 10000 miliseconds (10 seconds) and then redirect to the same URL, which will bring up a random post.

Sometimes you would want a “next” post to be displayed rather than a random post after certain posts. If the “next” hidden field exists, the value is expected to be the URL of the next slide to be shown on the signage. I do not recommend long chains, though. If there’s a next slide on a post, the next one to be seen will certainly be that one. However, since the plugin picks posts randomly, there is chance that your chain will start with a slide which is not the first one.  Make sure the last slide of the chain contains a “next” field value of

“http://signage.yourdomain.com?redirect_to=random”

so that the signage keeps on playing.

More Settings

The theme I used in my WP site is “Uni Education” which is one of the free WP themes that one can find in WP Theme repository. If you chose a different theme, make sure it allows Custom CSS through theme customization.

My theme Custom CSS is:

#top-menu{display:none}

.site-title a,p, html, body {font-family:Trebuchet, Verdana, Arial, Sans !important; }

.menu-toggle, .menu-open , .site-info {display:none}

html, body, p, td, tbody {color:#eeeeee !important; border:none}
table {border-style:none !important}
.site-title, html, body, p,tbody, td{ 
text-shadow:
-0px 0px 1px hsl(20, 100%, 0%),
-2px 2px 0px hsl(20, 100%, 0%),
-2px 2px 0px hsl(20, 100%, 0%);
}
html {overflow-y: hidden}
.inner-header-image {display:none}
.navigation, .post-navigation, .entry-meta {display:none}

Note that clases and IDs mentioned in my custom are theme dependent. Then set attributes to classes and IDs pertinent to my theme.

CSS Text shadowing looks good. If you want to change the default text color, background color on a per post basis, you can use the Custom CSS field which you will see while editing a post.

An example for a per-post custom CSS looks like:

body, html, table, p, td, tbody {background-color:#333 !important; text-shadow:none !important}
.tablepress-id-1 .column-4{text-align:right}
.tablepress-id-1 .column-5{text-align:right}

In the example above, custom CSS was used to right justify two columns in the table created using the TablePress plugin.

Please note that you probably will have to use the “!important” tag for every class or id attribute that you specify.

Things to Do on Raspberry Pi

When the RPi boots, it should boot into a desktop manager, logon automatically and start the chromium browser in kiosk mode.

The default user account in Raspbian is usually “pi”. You can use the utility raspi-config to make sure the RPi  boots into the desk manager and automatically logs on as the default user “pi”.

Boot Options –> Desktop / CLI –> Desktop Autologin

(If you have problems with setting the auto login user, you can edit /etc/lightdm/lightdm.conf to set autologin-user=pi.)

Next, set the resolution which is closest to the resolution of the display (probably a TV) that you will use.

raspi-config –> Advanced Options –> Resolution

Furthermore, you wouldn’t want the screensaver or power saving to kick in. Easiest way to disable these is editing /etc/lightdm/lightdm.conf manually. Change the line which reads “xserver-command=X” to “xserver-command=X -s 0 -dpms” in the [SeatDefaults] or [Seat:*] section of the configuration file.

Make sure that the user “pi” starts the chromium-browser automatically upon login. For best signage appearance, browser should be started in kiosk mode and directed to the URL of your WordPress site.

In order to start chromium when pi’s desktop is up; create the file /home/pi/.config/autostart/chromium-autostart.desktop and put the following text in it:

[Desktop Entry]
Type=Application
Exec=/usr/bin/chromium-browser --incognito --noerrdialogs --disable-session-crashed-bubble --disable-infobars --kiosk http://signage.bilkent.edu.tr
Hidden=false
X-GNOME-Autostart-enabled=true
Name[en_US]=AutoChromium
Name=AutoChromium
Comment=Start Chromium when desktop starts

Restart the RPi for these to take effect.

You might want to tweak the Raspbian a little further: setting up iptables firewall so that only authorized IP addresses can reach this machine. You wouldn’t want a defaced signage; would you?

Disabling Raspbian ( Raspbian 9.8 doesn’t check for updates by default) auto updates is also a good idea.

You might also want to turn off apache web server’s access and error logging.


Moving a Site Out From a Multi-Site WordPress Network

This documentation is for Linux only.

When I first learned about the Multi-Site capability of WordPress, I immediately liked the idea and started to experiment.

After a while, I decided that I should use this to offer personal WP sites to people in my community.

Eventually I realized that it was not really a good idea. Conflicting plugins, themes, not being able to upgrade freely were only a few of the nuisances. Refraining from upgrades is out of question. On the other hand, some updates can cause a conflict with many of the plugins and/or themes and this kills all the sites. Therefore at some point you have to move critical sites out of the network, one by one.

It s not easy to automate this process but after googling for a long time and reading a lot of things people had written, I managed to move a site out semi-automatically. Here are the steps to follow:

Step 1
Find out the ID number of the site that you want to move out of the multi-site network. This ID is displayed in the site list for the super-admin. Suppose the ID# is 28. Next, find out the table name prefix used on your multi-site database. Suppose it is “web2_”. (You can see this in the wp-config.php file, or by the “show tables;” MySQL command.)

Step 2
We shall need the dump of all tables of the site (e.g. ID#: 28) in question. To get this dump, install phpmyadmin on the multi-site server. If you do not want to install phpmyadmin and have shell access to the db server; you can use the following shell command:

mysqldump -u <dbUser> -p<dbPwd> <db> $(mysql -D <db> -u <dbUser> -p<dbPwd> -Bse “show tables like ‘<tablePrefix>\_<ID#>\_%'”) > /tmp/exported.sql

If you preferred and used the shell command way of dumping the tables, you can skip to Step 5.

Since I had a lot of sites in the network, I had hundreds of tables in the database. To make phpmyadmin list all tables, I had to tweak one of its parameters.

“Settings -> “Navigation Panel” -> “Maximum items in branch” = 250

and set  “max_input_vars = 10000” in the php.ini file so that the export function works properly and restart apache2.

Step 3
Using phpmyadmin, find all tables with names starting with the prefix and site ID# you’ve figured out in Step 1. (i.e. “web2_” and “28“) and check the boxes for all of them.

Step 4
Using the “With Selected” option box at the bottom of the phpmyadmin table listing, choose “Export” and get the dump file for these tables and save the file (say; /tmp/exported.sql).

Step 5
Install a fresh WordPress. Make sure that you install a WP of EXACTLY the same version with your multi-site installation. Not newer, not older! Suppose that the database name is “newdb” and table name prefix you chose for this fresh install is “wp_“.

Step 6
Using any text editor, change all occurrences of “web2_28_” with “wp_” in the /tmp/exported.sql file. Make sure that you make these changes ONLY on “CREATE TABLE”  and “INSERT INTO” and “LOCK TABLES” and “ALTER TABLE” lines.

Step 7
Install wp-cli (WordPress Command Line tool – see https://wp-cli.org) on the server that will host the moved site. The tool’s web site has excellent documentation about its installation.

Step 8
Copy the file export file to some directory on the new server. and execute the command

mysql -u root -p newdb < /tmp/exported.sql

Step 9
The export file has a lot of URL’s in the multi-site format. A typical one would look like

http://web2.bilkent.edu.tr/ds/wp-content/uploads/sites/28/2016/02/cropped-logo.jpg

and there will be a lot of path strings like “wp-content/uploads/sites/28” embedded here and there. URLs and file paths on standalone WP installations do not have the “/sites/nnn” strings.

These have to be corrected by removing the substrings “/sites/28” but you cannot do this using a text editor because the export file stores these info in serialized object data format which include string length info for each piece of string data.

WP-CLI will do it for you properly.

The wp-cli tool doesn’t want to run with root credentials, therefore I used a regular user’s account.

# su – myself
$ cd /var/www (or the directory where your fresh WP sits)
$ wp search-replace ‘sites/28/’ ” 

Step 10
Copy all files of the site to move (in our example the one with ID# 28) from the multi-site server’s “/var/www/wp-content/uploads/sites/28 ” directory to the  “/var/www/wp-content/uploads” directory on the new server.

Step 11
This is probably the hardest step. Due to the architecture of the multi-site WP, it is not possible to find which plugins are used in a certain site of the network (at least I couldn’t figure out how). If you already know which plugins your site has used among the network wide plugins, that is wonderful. Copy these plugins’ code files to the new server. If you don’t know which ones are used, you have to copy all of them. Then, later, you might try to remove plugins one by one and see what happens on the new site. Please note that the plugins that you have put under /var/www/wp-content/plugins directory will need to be activated on the fresh WP.

Step 12
Make sure that all the files and directories are owned by the web server user and group  (usually they are www-data:www-data).

Browse the new site and see if everything looks as it should. Check and test critical plugin-widget settings (like SMTP, firewall & security, galleries, carousels, video players, tables, contact form settings, etc.).

I personally didn’t loose any settings but now I have an excess of plugins for which I should try to figure out if they are used and remove them if they are not.

Java security problems on ebys.bilkent.edu.tr

Türkçe

Please note that ONLY those users who e-sign documents need to make the changes mentioned here.

As of 8th Jan., 2019, the web server on the ebys.bilkent.edu.tr site has been switched to secure http:,  that is;  the address of the site has been changed to “https://ebys.bilkent.edu.tr“. Even if one types the address with http in the URL, the browser will be automatically diverted to https://ebys.bilkent.edu.tr.

This change is going to cause problems with the Java code which must be downloaded from this address and executed when some document is being signed electronically.

To fix the issue, the users should add https://ebys.bilkent.edu.tr to the list of trusted sites on their own computers.

Fixing the Java security problem (actually adding https://ebys.bilkent.edu.tr to the trusted servers list):


Please click on the images to see them in full size.

1. Start the “Control Panel” application on your computer. Mac OSX users should click “System Preferences” in their Apple menu.

2. Double click the item with the Java logo to start “Java Control Panel”. Mac OSX users will find the Java logo for “Java Control Panel” at the bottom their System Preferences window. The rest is same for both Windows and OSX operating systems.


3. Click the “Security” tab of the Java Control Panel.

4. You will see a list of trusted sites. Click the “Edit Site List” button.

5. Locate the existing http://ebys.bilkent.edu.tr line and double click it to change contents to https://ebys.bilkent.edu.tr (note the “https” in place of “http:”

6. Click OK.

7. Close all the windows (even the ones which are not related to EBYS) of the web browser you are using to access EBYS. Restart your web browser.

8. Your Java will now trust our server.


ebys.bilkent.edu.tr sitesinde Java güvenlik hatası sorunu

English

Burada anlatılan değişiklikler SADECE e-imza kullanan kullanıcılarımızın bilgisayarlarında yapılmalıdır. e-İmza kullanmıyorsanız ayarları değiştirmenize gerek yoktur.

ebys.bilkent.edu.tr sitesindeki web sunucu,  8 Ocak 2019 tarihinden sonra sadece güvenli web protokolü ile çalışacak şekilde güncellenmiştir. Yani bundan sonra Elektronik Belge Yönetim Sistemi’mizin adresi https://ebys.bilkent.edu.tr olmuştur. Web tarayıcıda adres http:// olarak başlayacak şekilde yazılsa bile, tarayıcı otomatikman “https://ebys.bilkent.edu.tr” adresine yönlendirilecektir.

Bu değişiklik, e-imza atılma aşamasında sorun çıkaracaktır. e-imza modülü EBYS sunucusundan yüklenen bir Java kodu ile çalışmaktadır. Aşağıdaki gibi bir mesajla, yazılım https://ebys.bilkent.edu.tr adresinin güvenilir adresler arasında olmadığını belirtip, çalışmayı reddecektir.

Bu sorunu çözmek, daha doğrusu, https://ebys.bilkent.edu.tr adresini güvenilir adresler arasına eklemek için:

Ekran görüntülerini büyük olarak görmek için üzerlerine tıklayınız.

1. Bilgisayarınızda “Denetim Masası – Control Panel” uygulamasını açınız. Mac OSX kullanıcıları elma menüsünden “System Preferences” tıklamalıdıdr.

2. Java logosu bulunan ikonu çift tıklayarak Java Control Panel’ini başlatınız. Mac OSX kullanıcıları Java Control Paneli’ne ait Java logolu butonu “System Preferences” penceresinin en altında görecektir. Bundan sonrası hem Wİndows hem OSX işletim sistemleri için aynıdıdr.

3. Karşınıza gelen ekranda “Security” sekmesini tıklayınız.

4. Güvenli siteler listesi göreceksiniz. “Edit Site List” butonunu tıklayınız.

5. “Location” sütununda http://ebys.bilkent.edu.tr olan satırı çift tıklayınız ve adresi https://ebys.bilkent.edu.tr olarak değiştiriniz.

6. OK butonunu tıklayınız.

7. EBYS sistemine erişmek için kullandığınız web tarayıcınızın açık olan tüm pencerelerini (EBYS ile ilgili olsun-olmasın) kapatınız ve web tarayıcınızı yeniden başlatınız.

8. Artık Java’nız EBYS sunucumuza güvenecektir.


Setting up a SSTP client on Ubuntu 18.04

SSTP is a very nice, well performing Secure Socket Tunneling Protocol type VPN protocol. First designed and implemented by Microsoft to be used on Windows VPN servers, it is now available on all platforms.

It is secure because the traffic between the server and the client is always encrypted with SSL (just like https: for the web).

To install a SSTP client on a Ubuntu 18.04 box, I installed a few packages from a third party repository using the PPA  info provided here which mainly instructed me to issue the following commands:

sudo add-apt-repository ppa:eivnaes/network-manager-sstp
sudo apt-get update
sudo apt-get install network-manager-sstp  sstp-client

Thank you Kerem Yılmaz for providing the correct link to the new repo.

To create an SSTP connection, start “Settings”, select “Network” and click the “+” sign and now you can select “Point-to-point Tunneling Protocol (SSTP)”.

Enter your server name or address into “Gateway” box; leave NT Domain empty, set CA Certificate to “(None)”. No need to play with Advanced settings.

It works like a charm.


VirtualBox USB sharing – Linux Host

USB Passthru – Attaching a physical USB to VirtualBox client doesn’t work out-of-the-box. Apparently the solution is very very simple but not trivial. After messing around with kernel modules, VB settings, forums, docs; I found the solution deep in one of the forums:

When VirtualBox is installed, it adds a group named “vbxusers” to /etc/group.

In order USB Passthru to work, the user who is running VB on the Linux host, (“cayfer” in my case) must be added to this group; logout and login; vola…

Relevant /etc/group  entry should look like:

vboxusers:x:130:cayfer


USB Sharing on Linux NoMachine servers with Linux NoMachine Clients

I realized that, even on Ver. 6.3.6 of NoMachine , USB sharing didn’t work out of the box (that is,  in typical, straight forward installations).

To make USB sharing work (i.e. the USB stick you plug in to your client, appears as a USB device on the server) you need to compile nxusb.ko manually on the server (probably on the client as well) and restart the server and re-connect.

The manual compilation is done as follows:

Note: A more detailed document is at https://www.nomachine.com/AR11O00946

Make sure that Linux kernel headers are installed. If not, install them.

dpkg -l | grep linux-headers-$(uname -r)


Make sure that packages bintuils and gcc are installed. If not, install them.

Switch to root and compile nxusb kernel object.

sudo su –
cd /usr/NX/share/src/nxusb && make -f Makefile

In my case,  /usr/NX/bin/drivers/nxusb.ko already existed. But re-compilation generated a different size nxusb.ko file (a little bigger in size).

Copying the new /usr/NX/share/src/nxusb/nxusb.ko  onto /usr/NX/bin/drivers/nxusb.ko and restarting the server solved the issue. I did the same re-compilation and copying on the client as well; but I am not sure this was necessary.

What happens with Windows versions of NoMachine  and how to solve any problems (if there are any at all) with Windows servers and clients is not within my scope of interest.  I never tried it.

Creating an L2TP VPN connection on Mac OSX Sierra

Follow these steps to create a L2TP VPN connection on Mac OSX Sierra:

  1. Start “Preferences” and click “Network”

l2tp1

2. Click the “+” button at the bottom left to add a new connection and

  1. choose “VPN” from the “Interface” list
  2. choose “L2TP over IPSec” from the “VPN Type” list
  3. type in a descriptive name for the connection (such as: “Bilkent L2TP VPN”)

l2tp2

3. Make sure that the “Configuration” is set to “Default”.

Type  “l2tp.bilkent.edu.tr” into the  “Server address” box. Please note that the name of the server starts with lowercase “L”; not the digit “1”

Type your VPN account name into the “Account name” box. This account name is the name of the account that you should have created yourself at the address: http://vpnregister.bilkent.edu.tr .

4. Click the “Advanced” button and make sure that “Send all traffic over VPN connection” option is enabled.

5. Click the “Authentication” button and make sure that “User Authenticaion” method “Password” is enabled and your VPN account password is in the box next to it.

Please also make sure that “Machine Authentication” method “Shared Secret” is anabled and it is set to to the word “bilkent” (lowercase and without the quotes).

6. Click “Apply” and “OK” buttons all the way to the start screen and finally click the “Connect” button to establish a VPN connection.

7. Once you create this connection, you should always see a VPN icon at the top. You can use this button whenever you want to establish a VPN connection.

 l2tp6

To test whether a VPN connection has been established correctly, user your web browser to visit http://whatismyip.com . You should see a Bilkent network IP address which starts with 139.179 (e.g. 139.179.111.34) as your computer’s IP address.

Installing Matlab with Campus License on a virtual Linux OpenVZ container

Matlab handles campus licenses using the MAC address of the /dev/eth0 device.
An OpenVZ container, however, does not have a /dev/eth0 device
One can add a virtual eth0 interface by:

  1. shutting down the container machine
  2. Issuing the
    vzctl set VMID# --netif_add eth0 --save

    command replacing the “VMID# with container’s numerical ID number

  3. Restarting the container

MultiSite WordPress "Request exceeded the limit…" error

If you see a LOT of ( I mean a lot) messages like “Request exceeded the limit of 10 internal redirects” in your Apache error logs, then you need to edit your .htaccess file in the WordPress root directory so that the lines which read

RewriteRule ^([0-9a-zA-Z-]+/)?(wp-(content|admin|includes).*) $2 [L]
RewriteRule ^([0-9a-zA-Z-]+/)?(.*\.php)$ $2 [L]

become

RewriteRule ^([0-9a-zA-Z-]+/)(wp-(content|admin|includes).*) $2 [L]
RewriteRule ^([0-9a-zA-Z-]+/)(.*\php)$ $2 [L]

That is; remove the “?” marks. No restart of anything is needed.